Thoughts, musings, and frustrations in the pursuit of perfection. In short, complicating simplicity.

Wednesday, August 25, 2010

New tank!

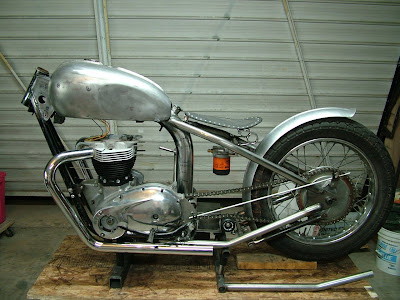
This project started when our current client saw this fabrication shot, and asked if we could do a bare metal tank and fender. Not being a fan of clear coat over steel (since it looks like clear coat over steel, and I have heard that it is possible for water to condense between the clear coat and steel), I went looking for an alternate solution. The client lives in Louisiana, and is in the military, so giving the tank a monthly coat of polish wasn't going to cut it, between humidity and deployment, it would have never looked good, particularly since the fender is aluminum, and they would never looked right together on the bike.


Half done, kinda.

Enter the solution. I helped a buddy of mine build his Triumph while he was in San Diego, and long story short, the answer is having molten metal sprayed onto a gas tank. This one was done in aluminum, but I think a brass tank and fender would be really cool too.
The piece coming back from the sprayer has a texture similar to sprayed ceiling, which is a bit of pain to finish. I knocked it down a bit with an orbital sander, then spent an ungodly amount of time hand sanding.
mm... popcorn.

Wednesday, August 18, 2010

mounts... process

Scan, trace, cut out, curse. Repeat

Finalized for waterjetting.


Back from waterjetting

   Water jetting is a time saver when it comes to fabricating custom mounts, so long as I remember to double and triple check hole alignment and clearances. And, while water jetting is precise to 5 thousandths of an inch, it is not as precise as say, laser cutting, and things can skew slightly when cutting extremely thick material. For my purposes, though, it is a time saving device for the right price. While water jet pieces do need some cleaning up, its something I expect to do on all my bikes, since I sandblast and powder coat just about everything anyway. 


Saturday, August 14, 2010

on hard tails and mounts

Jig and Axle plates
   I decided to start making my own hardtails this year, since the quality of off the shelf stuff seems to have gone down, and building my own meant complete control over the way the hardtail would sit. The hardtails I want on my bikes use tubing 1 1/4" diameter, 1/8 walled to match the rest of the frame; solid axle plates 3/8" or 1/2" thick; and have my idea of optimal stretch and drop. In order to get frame geometry correct, we built a jig, measured our angles; and used a decent amount of CAD, both cardboard aided design and computer aided design. For our axle plates, that means drawing files to be sent to the water jetters. Simple, but it means drawingwith illustrator, cutting out mockups (preferably with mat board), cursing, and redoing until it works right.

Wednesday, August 11, 2010

Lorem Ipsum

He can measure without a ruler. If he can not create to his standards, he finds someone who can. He will redo a part over and over, in order to fix an issue that no one else would ever see. When bikes on the street see him, they fall over in hopes that he will fix them. Metal melts like putty to his will.  He is: the most interesting man in the world.